

MariaDB Cluster for High Availability
In a world powered by data, businesses can't afford downtime or data inconsistencies. High availability and scalability are no longer optional, they are essential. MariaDB Cluster is a synchronous multi-master database cluster solution that ensures data consistency, fault tolerance, and performance at scale.
Architecture of MariaDB Galera Cluster
Unlike traditional master-slave replication where writes are limited to a single server, MariaDB Galera Cluster allows every node to be a master. This multi-master architecture enables both read and write operations on any node in the cluster simultaneously. If one node fails, the others seamlessly continue to serve requests without disruption, making it an incredibly robust choice for enterprises that demand reliability.
This guide will walk you through the complete process of setting up a three-node MariaDB Galera Cluster, ensuring your database infrastructure is both resilient and highly available.
Prerequisites for Setting Up MariaDB Galera Cluster
Before jumping into the installation, it’s crucial to ensure you have the right foundation in place. A well-prepared environment is the key to a stable and performant cluster.
Testing Environment:
For this tutorial, we will use the following testing environment:
Step-by-Step Installation and Configuration
Phase 1: Installing MariaDB and Galera Cluster Components
First, let's prepare the system by updating the package lists and installing required prerequisites.
1. Install prerequisites:
apt-get update
apt-get install apt-transport-https curl
Logs:
root@mydbopslab:/home/mydbops# apt-get install apt-transport-https curl
Reading package lists... Done
Building dependency tree... Done
Reading state information... Done
curl is already the newest version (7.81.0-1ubuntu1.20).
The following packages will be upgraded:
  apt-transport-https
1 upgraded, 0 newly installed, 0 to remove and 76 not upgraded.
Need to get 1510 B of archives.
After this operation, 0 B of additional disk space will be used.
Do you want to continue? [Y/n] y
Get:1 http://archive.ubuntu.com/ubuntu jammy-updates/universe amd64 apt-transport-https all 2.4.14 [1510 B]
Fetched 1510 B in 0s (4475 B/s)
(Reading database ... 200998 files and directories currently installed.)
Preparing to unpack .../apt-transport-https_2.4.14_all.deb ...
Unpacking apt-transport-https (2.4.14) over (2.4.12) ...
Setting up apt-transport-https (2.4.14) ...
Scanning processes...
Scanning candidates...
Scanning linux images...

Running kernel seems to be up-to-date.

Restarting services...
Service restarts being deferred:
 systemctl restart NetworkManager.service
 /etc/needrestart/restart.d/dbus.service
 systemctl restart getty@tty1.service
 systemctl restart networkd-dispatcher.service
 systemctl restart systemd-logind.service
 systemctl restart unattended-upgrades.service
 systemctl restart user@1000.service

No containers need to be restarted.

No user sessions are running outdated binaries.

No VM guests are running outdated hypervisor (qemu) binaries on this host.
root@mydbopslab:/home/mydbops#
2. Add MariaDB repository key:
Next, we need to add the official MariaDB signing key to ensure the authenticity of the packages.
sudo mkdir -p /etc/apt/keyrings
sudo curl -o /etc/apt/keyrings/mariadb-keyring.pgp 'https://mariadb.org/mariadb_release_signing_key.pgp'
Logs:
root@mydbopslab:/home/mydbops# mkdir -p /etc/apt/keyrings
root@mydbopslab:/home/mydbops# curl -o /etc/apt/keyrings/mariadb-keyring.pgp 'https://mariadb.org/mariadb_release_signing_key.pgp'
  % Total    % Received % Xferd  Average Speed   Time    Time     Time  Current
                                 Dload  Upload   Total   Spent    Left  Speed
100  6575  100  6575    0     0  11758      0 --:--:-- --:--:-- --:--:-- 11783
root@mydbopslab:/home/mydbops#
3. Create MariaDB sources file:
Now, create a repository file that points to the MariaDB 11.8 package sources.
vi /etc/apt/sources.list.d/mariadb.sourcesLogs:
root@mydbopslab:/home/mydbops# vi /etc/apt/sources.list.d/mariadb.sources
root@mydbopslab:/home/mydbops# cat /etc/apt/sources.list.d/mariadb.sources
# MariaDB 11.8 repository list - created 2025-08-18 09:37 UTC
# https://mariadb.org/download/
X-Repolib-Name: MariaDB
Types: deb
# deb.mariadb.org is a dynamic mirror if your preferred mirror goes offline. See https://mariadb.org/mirrorbits/ for details.
# URIs: https://deb.mariadb.org/11.8/ubuntu
URIs: https://mirrors.iitd.ac.in/mariadb/repo/11.8/ubuntu
Suites: jammy
Components: main main/debug
Signed-By: /etc/apt/keyrings/mariadb-keyring.pgp
root@mydbopslab:/home/mydbops#4. Update and install MariaDB + Galera
With the repository configured, update your package list again and install mariadb-server and galera-4.
apt-get update
apt-get install mariadb-server galera-4
Logs:
root@mydbopslab:/home/mydbops# apt-get update
Hit:1 http://repo.mysql.com/apt/ubuntu jammy InRelease
Get:2 https://mirrors.iitd.ac.in/mariadb/repo/11.8/ubuntu jammy InRelease [7764 B]
Get:3 http://security.ubuntu.com/ubuntu jammy-security InRelease [129 kB]
Get:4 https://mirrors.iitd.ac.in/mariadb/repo/11.8/ubuntu jammy/main amd64 Packages [16.3 kB]
Get:5 https://mirrors.iitd.ac.in/mariadb/repo/11.8/ubuntu jammy/main/debug amd64 Packages [15.7 kB]
Hit:6 http://archive.ubuntu.com/ubuntu jammy InRelease
Get:8 http://archive.ubuntu.com/ubuntu jammy-updates InRelease [128 kB]
Hit:9 https://repo.zabbix.com/zabbix/6.4/ubuntu jammy InRelease
Get:11 http://archive.ubuntu.com/ubuntu jammy-backports InRelease [127 kB]
Ign:7 https://repo.r1soft.com/apt stable InRelease
Get:13 http://archive.ubuntu.com/ubuntu jammy-updates/main amd64 Packages [2804 kB]
Hit:12 https://repo.r1soft.com/apt stable Release
Hit:10 https://packagecloud.io/sensu/stable/ubuntu jammy InRelease
Get:15 http://archive.ubuntu.com/ubuntu jammy-updates/universe amd64 Packages [1226 kB]
Fetched 4454 kB in 4s (1245 kB/s)
Reading package lists... Done
root@mydbopslab:/home/mydbops# apt-get install mariadb-server galera-4
Reading package lists... Done
Building dependency tree... Done
Reading state information... Done
The following packages were automatically installed and are no longer required:
  mecab-ipadic mecab-ipadic-utf8 mecab-utils
Use 'sudo apt autoremove' to remove them.
The following additional packages will be installed:
  libcgi-fast-perl libcgi-pm-perl libclone-perl libconfig-inifiles-perl libdbd-mysql-perl libdbi-perl libencode-locale-perl libfcgi-bin libfcgi-perl
  libfcgi0ldbl libhtml-parser-perl libhtml-tagset-perl libhtml-template-perl libhttp-date-perl libhttp-message-perl libio-html-perl liblwp-mediatypes-perl
  libmariadb3 libmysqlclient21 libpcre2-posix3 libtimedate-perl liburi-perl mariadb-client mariadb-client-compat mariadb-client-core mariadb-common
  mariadb-server-compat mariadb-server-core pv socat
Suggested packages:
  libmldbm-perl libnet-daemon-perl libsql-statement-perl libdata-dump-perl libipc-sharedcache-perl libbusiness-isbn-perl libwww-perl mailx mariadb-test
  doc-base
5. Verify installation
Finally, let's confirm that MariaDB has been installed correctly and the service is running.
mariadb --version
service mariadb status
Logs:
root@mydbopslab:/home/mydbops# mariadb --version
mariadb from 11.8.3-MariaDB, client 15.2 for debian-linux-gnu (x86_64) using  EditLine wrapper
root@mydbopslab:/home/mydbops#
root@mydbopslab:/home/mydbops# service mariadb status
● mariadb.service - MariaDB 11.8.3 database server
     Loaded: loaded (/lib/systemd/system/mariadb.service; enabled; vendor preset: enabled)
    Drop-In: /etc/systemd/system/mariadb.service.d
             └─migrated-from-my.cnf-settings.conf
     Active: active (running) since Mon 2025-08-18 15:21:03 IST; 31s ago
       Docs: man:mariadbd(8)
             https://mariadb.com/kb/en/library/systemd/
    Process: 29576 ExecStartPre=/usr/bin/install -m 755 -o mysql -g root -d /var/run/mysqld (code=exited, status=0/SUCCESS)
    Process: 29577 ExecStartPre=/bin/sh -c [ ! -e /usr/bin/galera_recovery ] && VAR= ||   VAR=`/usr/bin/galera_recovery`; [ $? -eq 0 ]   && echo _WSREP_START>
    Process: 29628 ExecStartPost=/bin/rm -f /run/mysqld/wsrep-start-position (code=exited, status=0/SUCCESS)
    Process: 29629 ExecStartPost=/etc/mysql/debian-start (code=exited, status=0/SUCCESS)
   Main PID: 29614 (mariadbd)
     Status: "Taking your SQL requests now..."
      Tasks: 13 (limit: 64878)
     Memory: 92.6M
        CPU: 4.440s
     CGroup: /system.slice/mariadb.service
             └─29614 /usr/sbin/mariadbd

Aug 18 15:20:59 mydbopslab systemd[1]: Starting MariaDB 11.8.3 database server...
Aug 18 15:21:03 mydbopslab systemd[1]: Started MariaDB 11.8.3 database server.
Aug 18 15:21:03 mydbopslab /etc/mysql/debian-start[29648]: Triggering myisam-recover for all MyISAM tables and aria-recover for all Aria tables
root@mydbopslab:/home/mydbops#
Repeat these installation steps on all three nodes before proceeding.
Phase 2: Configuring Galera Cluster
Configuration is handled primarily via a .cnf file in /etc/mysql/conf.d/. We will create 60-galera.cnf to hold our cluster settings.
Bootstrapping Node1:
On the first node, create and edit this file with the following configuration. The special gcomm:// address tells this node to initialize a new cluster because it cannot find any other nodes to connect to.
[mysqld]
binlog_format=ROW
default_storage_engine=InnoDB
innodb_autoinc_lock_mode=2
bind-address=0.0.0.0

# Galera Cluster settings
wsrep_on=ON
wsrep_provider=/usr/lib/galera/libgalera_smm.so
wsrep_cluster_name="Mydbops Blog Cluster"
wsrep_cluster_address="gcomm://"
wsrep_node_address="<IP_of_Node1>"
wsrep_node_name="node1"
After saving the changes, restart the MariaDB service. The cluster will now be bootstrapped with a single active node. You can verify this by checking the cluster size.
MariaDB [(none)]>  show global status like 'wsrep_cluster_size';
+--------------------+-------+
| Variable_name      | Value |
+--------------------+-------+
| wsrep_cluster_size | 1     |
+--------------------+-------+
1 row in set (0.001 sec)
Phase 3: Adding Additional Nodes to the Cluster
With the first node running, we can now add the second and third nodes. Their configuration will be slightly different, as they need to connect to the existing cluster.
Adding Node2:
On your second node, create the 60-galera.cnf file with the following settings. Note that wsrep_cluster_address now points to the IP addresses of the nodes that are part of the cluster.
[galera]
# Mandatory settings
wsrep_on                 = ON
wsrep_provider           = /usr/lib/libgalera_smm.so
wsrep_cluster_name       = "Mydbops Blog Cluster"
wsrep_cluster_address    = "gcomm://<Node1 IP>,<Node2 IP>
binlog_format            = row
default_storage_engine   = InnoDB
innodb_autoinc_lock_mode = 2
wsrep_node_name          = 'Node2'
wsrep_node_address       = '<Node2 IP>'
Start the MariaDB service on Node 2. It will connect to Node 1, synchronize its state, and join the cluster. Let's verify the cluster size again from any node:
MariaDB [(none)]>  show global status like 'wsrep_cluster_size';
+--------------------+-------+
| Variable_name      | Value |
+--------------------+-------+
| wsrep_cluster_size | 2     |
+--------------------+-------+
1 row in set (0.001 sec)
Adding Node3:
Finally, configure the third node with the IP addresses of all nodes in the cluster address list.
[galera]
# Mandatory settings
wsrep_on                 = ON
wsrep_provider           = /usr/lib/libgalera_smm.so
wsrep_cluster_name       = "Mydbops Blog Cluster"
wsrep_cluster_address    = "gcomm://<Node1 IP>,<Node2 IP>,<Node3 IP>
binlog_format            = row
default_storage_engine   = InnoDB
innodb_autoinc_lock_mode = 2
wsrep_node_name          = 'Node3'
wsrep_node_address       = '<Node3 IP>'
Start the service on Node 3. The cluster is now fully operational with three master nodes.
MariaDB [(none)]>  show global status like 'wsrep_cluster_size';
+--------------------+-------+
| Variable_name      | Value |
+--------------------+-------+
| wsrep_cluster_size | 3     |
+--------------------+-------+
1 row in set (0.001 sec)
Achieving Seamless Failover with Load Balancing
Galera Cluster already provides high availability by design, thanks to its synchronous multi-master replication. However, to achieve seamless failover and minimize downtime in real-world production environments, it’s best to combine Galera with additional high-availability tools:
If you’re evaluating HA approaches across database engines, see how PostgreSQL achieves high availability with a Patroni cluster setup as a comparison reference.
ProxySQL:
ProxySQL is more than just a load balancer, it’s a high-performance SQL-aware proxy designed specifically for MySQL/MariaDB environments.
- Intelligent Query Routing: It can direct read queries to replica nodes while keeping write queries on a designated primary, reducing contention and improving performance.
- Health Checks: ProxySQL continuously monitors the health of MariaDB nodes. If a node becomes unresponsive or falls out of sync, ProxySQL automatically reroutes queries to healthy nodes.
- Connection Pooling: By maintaining persistent connections, it reduces connection overhead and improves throughput.
- Seamless Failover: When a node fails, ProxySQL transparently shifts traffic, ensuring applications remain connected without needing manual intervention.
For enterprise deployments, MaxScale — MariaDB’s purpose-built database proxy — offers advanced query routing, read/write splitting, and a built-in database firewall alongside Galera Cluster.
Keepalived
Keepalived provides node-level failover by managing a Virtual IP (VIP) that always points to the currently active database node.
- High Availability via VRRP: It uses the Virtual Router Redundancy Protocol (VRRP) to assign a floating IP between ProxySQL cluster nodes. The node with the highest priority (or health status) holds the VIP.
- Automatic Failover: If the primary node holding the VIP fails, Keepalived automatically promotes another healthy node to take over the IP. Applications continue using the same VIP without needing reconfiguration.
- Health Checks: Keepalived can be configured to monitor ProxySQL services. If a service check fails, it triggers an IP failover to another node.
- Reduced Downtime: This approach ensures near-zero disruption because clients always connect through the VIP, regardless of which physical node is currently active.
- Scalability: When paired with ProxySQL, Keepalived ensures that the load balancer itself remains highly available, avoiding a single point of failure.
By integrating these components, you create a fault-tolerant setup where node failures are handled automatically. Applications remain connected, traffic flows smoothly, and end-users experience little to no disruption.
Monitoring and Troubleshooting MariaDB Cluster
Proactive monitoring is essential for maintaining a healthy MariaDB Cluster. Minor issues can quickly cascade into larger disruptions if left unchecked. Here are the key metrics to watch.
For a detailed walkthrough of common failure scenarios and recovery steps, see our guide on troubleshooting MariaDB Galera Cluster issues.
Monitoring Tools
MariaDB cluster provides a set of wsrep (Write Set Replication) status variables that give detailed insight into cluster health.
Key metrics to monitor:
- wsrep_cluster_size → Current number of nodes in the cluster.
- wsrep_ready → Whether the node is ready to serve queries.
- wsrep_local_state_comment → Shows node state (e.g., Synced, Joining, Donor).
- wsrep_flow_control_paused → Indicates if replication flow control is pausing writes due to lag.
These variables help identify issues like lag, desync, or node inconsistency.
Percona Monitoring and Management (PMM)
- PMM fetchh metrics from MariaDB exporters and Galera-specific exporters.
- PMM provides rich dashboards with visual alerts, historical trends, and cluster performance insights.
- Common metrics to visualize: replication latency, cluster size, flow control events, and query throughput.
- Alerts can be configured for node failures, replication stalls, or abnormal query loads.
1. Flow Control Paused Time

- Metric Definition: The percentage of time replication was paused due to flow control. Flow control kicks in when a node's replication queue gets too large, pausing writes until lagging nodes catch up.
- Operational Significance: High or frequent pauses indicate replication bottlenecks often due to slow disk I/O, network latency, or uneven node performance. This impacts write throughput.
- Monitoring Guidance: If your application experiences unexpected latency or reduced throughput, check here first. Consistently high values (>5–10%) are a red flag.
2. Flow Control Messages Sent

- Metric Definition: The number of flow control messages a node sends to throttle the cluster. A spike means a node is struggling to keep up with replication.
- Operational Significance: Frequent flow control messages suggest a node is a bottleneck — possibly due to CPU, memory, or disk performance issues.
- Monitoring Guidance: If replication pauses (from Graph 1) are high, use this graph to identify which node is slowing down the cluster.
3. Receive Queue
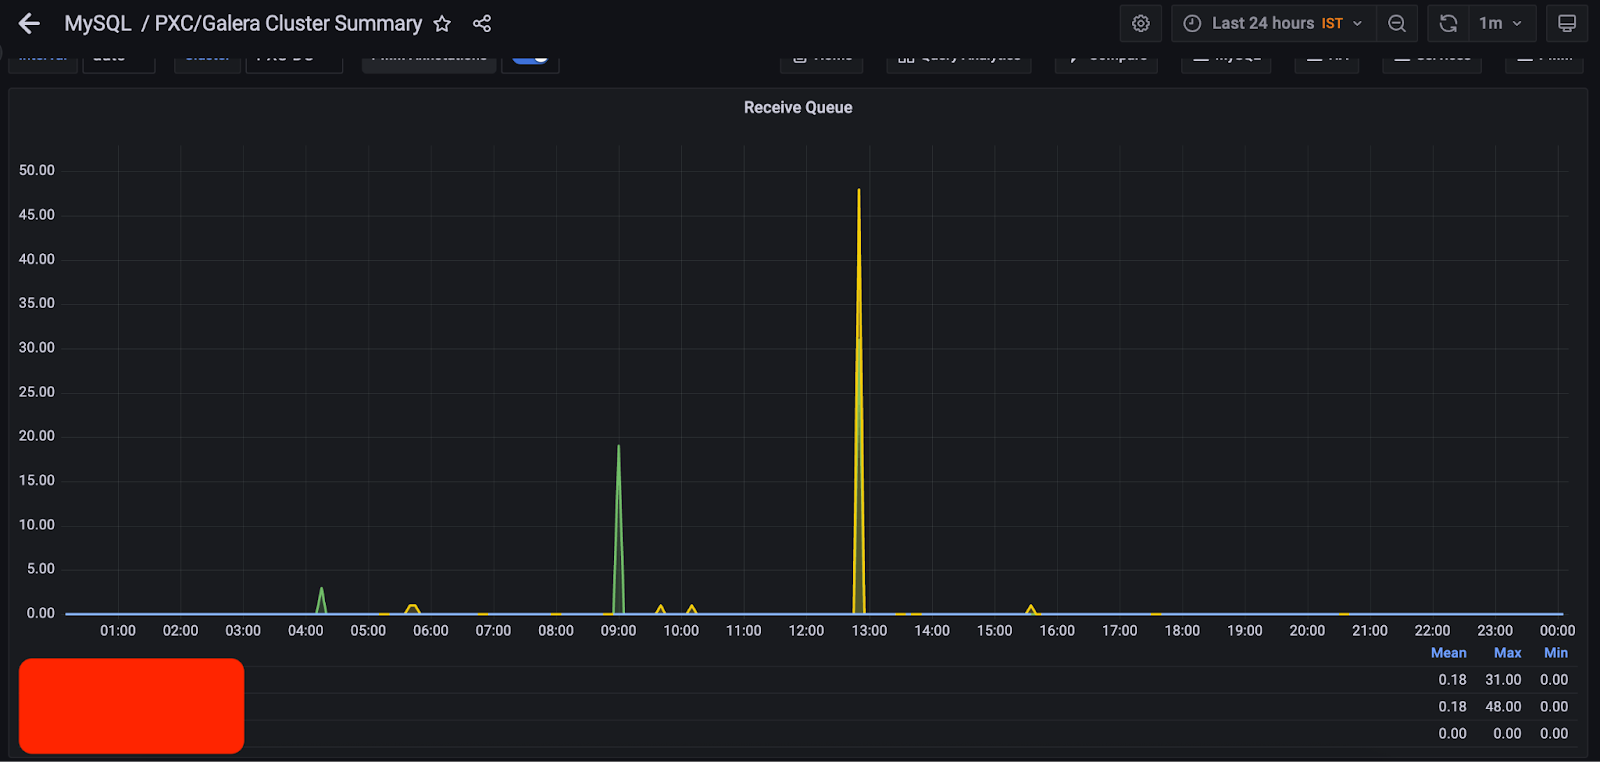
- Metric Definition: The number of transactions waiting in a node's replication receive queue before being applied.
- Operational Significance: A growing queue means replication lag is building up. This can lead to inconsistent reads or even node desync if left unchecked.
- Monitoring Guidance: During peak workload or replication issues, monitor this closely. Ideally, queues should remain low and stable.
4. IST Progress (Incremental State Transfer)
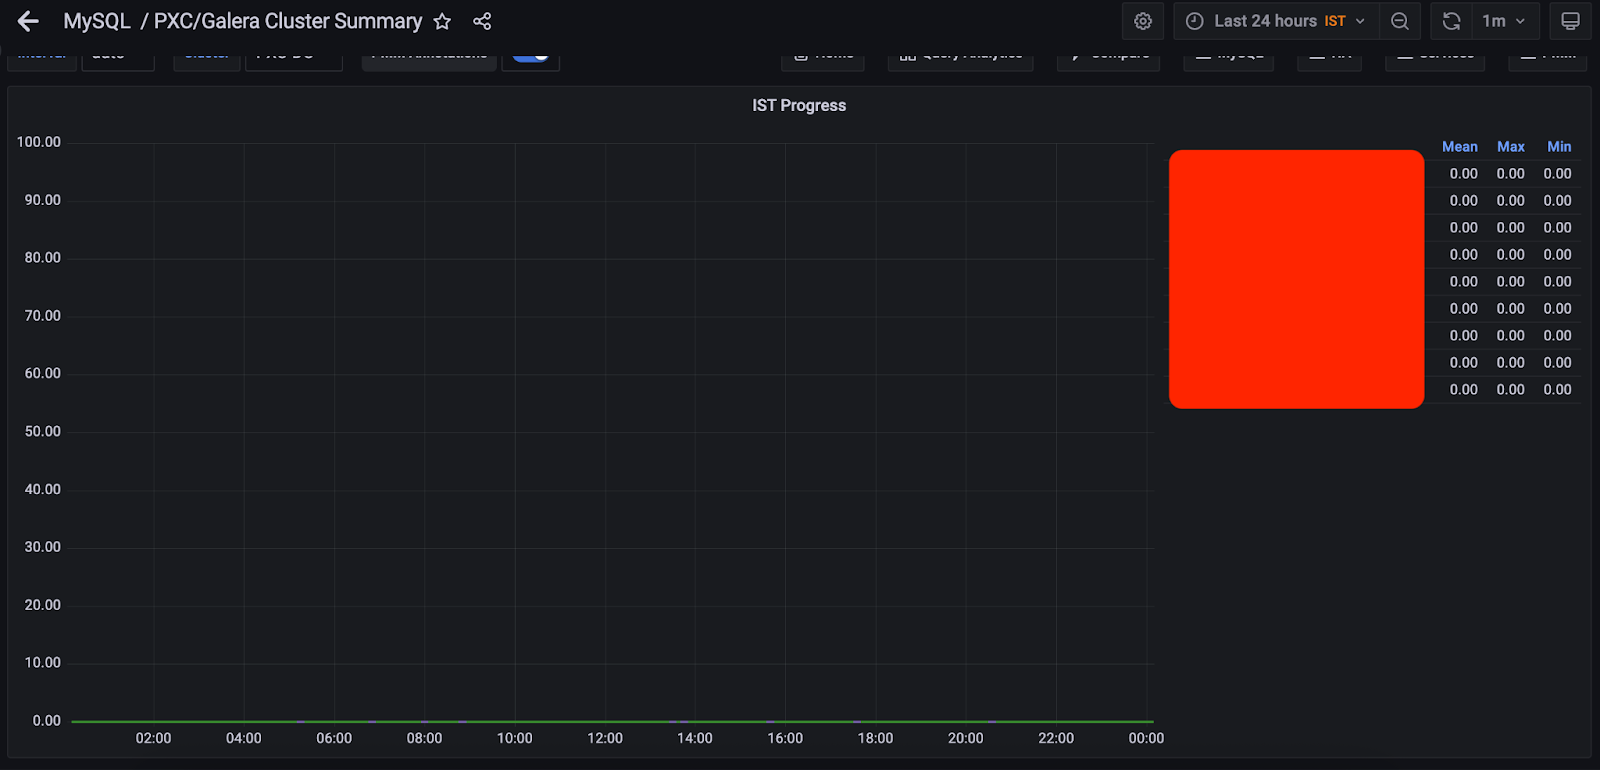
- Metric Definition: Progress of IST (used when a node rejoins the cluster and only needs recent transactions, not a full SST).
- Operational Significance: A flat line at 0 means no IST in progress. If IST is running, you'll see values indicating how much data has been applied. Failed or stuck IST means a node won't rejoin properly.
- Monitoring Guidance: Whenever a node crashes, restarts, or rejoins the cluster. Use this to ensure recovery is progressing smoothly.
5. Average Galera Replication Latency

- Metric Definition: The average delay in propagating transactions between nodes (in microseconds).
- Operational Significance: Low latency (<1 ms) is ideal. Spikes indicate network jitter or overloaded nodes, which can slow down cluster-wide commits.
- Monitoring Guidance: If your application reports delayed writes, check this graph. Sustained high latency means you may need to optimize the network, tune Galera settings, or scale hardware.
Conclusion
MariaDB Galera Cluster is a powerful solution for businesses needing high availability, fault tolerance, and real-time data consistency. By properly configuring nodes, enabling automatic failover, and implementing load balancing, you can achieve a resilient database infrastructure that scales with your needs.
For a real-world example, see how Mydbops delivered zero-downtime scalability using High Availability for MySQL with RDS Multi-AZ and ProxySQL.
You've now seen the incredible power a well-architected MariaDB Galera Cluster offers for mission-critical applications, from e-commerce platforms to enterprise systems. But designing, implementing, and maintaining a production-grade cluster requires deep expertise to ensure it remains stable, secure, and performant.
That’s where we come in. As a MariaDB Silver Partner, Mydbops specializes in building and managing robust MariaDB environments. Our expert team provides comprehensive MariaDB Managed Services, strategic Consulting, 24/7 Support, and dedicated Remote DBA services to ensure your cluster delivers peak performance and reliability, without the operational overhead.
Let us handle the complexity, so you can focus on your business.

.avif)
%20Issues%20in%20SQL%20Server%20(1).avif)
%20Issues%20in%20SQL%20Server.avif)


.svg)
